Zero to Hero: A Comprehensive Guide to Redux with ReactJS
Welcome, aspiring React developers and state management enthusiasts! If you’ve been building React applications, you’ve likely encountered the challenge of managing complex application state. As your app grows, passing props down through multiple layers of components (prop drilling) can become cumbersome, and keeping track of data flow can turn into a nightmare. This is where Redux steps in – a predictable state container for JavaScript apps that helps you write consistent applications, run in different environments (client, server, and native), and is easy to test.
In this “Zero to Hero” tutorial, we’ll embark on a journey from understanding the fundamental principles of Redux to building real-world applications with React, complete with practical examples and best practices. By the end, you’ll have a solid grasp of Redux and the confidence to integrate it into your next big project.
What is Redux and Why Do We Need It?
At its core, Redux is a standalone JavaScript library for managing application state. It can be used with any UI framework or library, including React, Angular, and Vue. The main problems Redux solves are:
- Centralized State: Provides a single source of truth for your application’s state, making it easier to debug and understand.
- Predictable State Updates: All state changes are made through pure functions called “reducers,” ensuring that given the same input, you’ll always get the same output.
- Debugging Power: With tools like Redux DevTools, you can easily inspect every state change, replay actions, and even time-travel debug.
The Core Principles of Redux
Redux is built on three fundamental principles:
- Single Source of Truth: The state of your entire application is stored in an object tree within a single store.
- State is Read-Only: The only way to change the state is to emit an action, an object describing what happened.
- Changes are Made with Pure Functions: To specify how the state tree is transformed by actions, you write pure reducers.
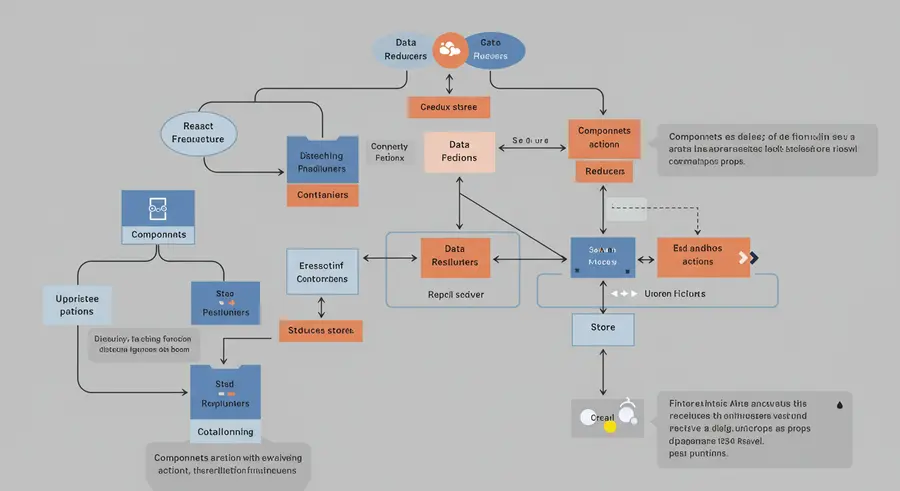
Figure 1: Simplified React Redux Architecture and Data Flow
Redux Core Concepts: The Building Blocks
Before we dive into coding, let’s understand the essential concepts that make up a Redux application:
1. Store
The Redux store is the single source of truth for your application’s state. It holds the entire state tree of your app. There should only be one store in a Redux application.
The store has a few responsibilities:
- Holds the application state.
- Allows access to the state via
getState(). - Allows state to be updated via
dispatch(action). - Registers listeners via
subscribe(listener). - Handles unregistering of listeners via the function returned by
subscribe(listener).
2. Actions
Actions are plain JavaScript objects that describe what happened in the application. They are the only way to send data from your application to your Redux store. Actions must have a type property that indicates the type of action being performed. Typically, the type is defined as a string constant.
Example of an action:
{
  type: 'ADD_TODO',
  payload: {
    id: 1,
    text: 'Learn Redux'
  }
}
Actions creators are functions that return an action object. This makes them reusable and less prone to errors.
const addTodo = (text) => {
  return {
    type: 'ADD_TODO',
    payload: {
      id: Date.now(),
      text
    }
  };
};
3. Reducers
Reducers are pure functions that take the current state and an action as arguments, and return a new state. They describe how the application’s state changes in response to actions. Important: Reducers must be pure functions – they should not mutate the original state, perform side effects (like API calls), or call non-pure functions (like Date.now() directly without dispatching an action that includes the timestamp).
Example of a reducer:
const initialState = {
  todos: []
};

const todoReducer = (state = initialState, action) => {
  switch (action.type) {
    case 'ADD_TODO':
      return {
        ...state,
        todos: [...state.todos, action.payload]
      };
    case 'TOGGLE_TODO':
      return {
        ...state,
        todos: state.todos.map(todo =>
          todo.id === action.payload.id ? { ...todo, completed: !todo.completed } : todo
        )
      };
    default:
      return state;
  }
};
4. Dispatch
dispatch is a method available on the Redux store. It’s the way you trigger a state change. When you call store.dispatch(action), Redux passes the action to the reducer(s), which then compute the new state.
store.dispatch(addTodo('Build a Redux app'));
5. Selectors
Selectors are functions that encapsulate the logic for reading data from the Redux store state. They make it easier to extract specific pieces of information from the state, promoting reusability and keeping your components clean.
const selectTodos = (state) => state.todo.todos;
const selectCompletedTodos = (state) => state.todo.todos.filter(todo => todo.completed);
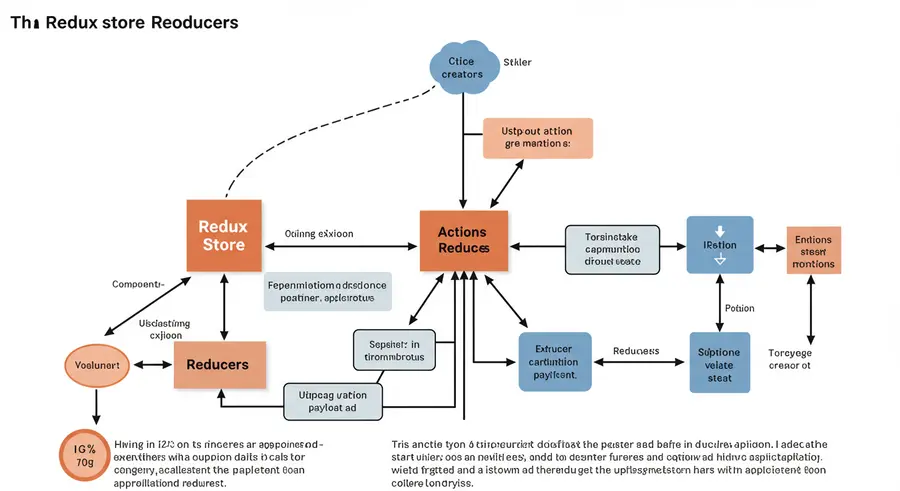
Figure 2: How Redux Store, Actions, and Reducers Interact
Setting Up a Redux Project with React
Let’s get our hands dirty and set up a basic React application with Redux. We’ll use Create React App for a quick start.
Step 1: Create a React App
npx create-react-app redux-hero-tutorial
cd redux-hero-tutorial
Step 2: Install Redux and React-Redux
redux is the core library, and react-redux provides the bindings that allow React components to interact with the Redux store.
npm install redux react-redux @reduxjs/toolkit
We’re also installing @reduxjs/toolkit. While you can use plain Redux, Redux Toolkit is the recommended way to write Redux logic today. It simplifies common Redux tasks and helps avoid common mistakes. This tutorial will primarily use Redux Toolkit.
Step 3: Create Your Redux Store
In your src folder, create a new folder called app and inside it, a file named store.js:
// src/app/store.js
import { configureStore } from '@reduxjs/toolkit';

export const store = configureStore({
  reducer: {
    // We'll add our reducers here later
  },
});
Step 4: Provide the Store to Your React App
Now, we need to make the Redux store available to our React components. We do this using the Provider component from react-redux in your src/index.js file.
// src/index.js
import React from 'react';
import ReactDOM from 'react-dom/client';
import './index.css';
import App from './App';
import { store } from './app/store';
import { Provider } from 'react-redux';

const root = ReactDOM.createRoot(document.getElementById('root'));
root.render(


);
By wrapping your App component with <Provider store={store}>, all components within your application will have access to the Redux store.
Building a Simple Counter App: Your First Redux Application
Let’s create a classic counter application to demonstrate the core Redux flow.
Step 1: Define Your Slice (Actions & Reducers with Redux Toolkit)
Redux Toolkit introduces the concept of “slices.” A slice is a collection of Redux reducer logic and actions for a single feature in your app, typically defined together in a single file.
Create a new folder features inside src, and inside it, another folder named counter. Then, create counterSlice.js:
// src/features/counter/counterSlice.js
import { createSlice } from '@reduxjs/toolkit';

const initialState = {
  value: 0,
};

export const counterSlice = createSlice({
  name: 'counter',
  initialState,
  reducers: {
    increment: (state) => {
      // Redux Toolkit allows us to write "mutating" logic in reducers;
      // it doesn't actually mutate the state because it uses the Immer library,
      // which detects changes to a "draft state" and produces a brand new immutable state.
      state.value += 1;
    },
    decrement: (state) => {
      state.value -= 1;
    },
    incrementByAmount: (state, action) => {
      state.value += action.payload;
    },
  },
});

// Action creators are generated for each case reducer function
export const { increment, decrement, incrementByAmount } = counterSlice.actions;

export default counterSlice.reducer;
Notice how createSlice automatically generates action creators (increment, decrement, incrementByAmount) and a reducer function for you based on the reducers you define.
Step 2: Add the Counter Reducer to the Store
Update your src/app/store.js to include the new counterReducer:
// src/app/store.js
import { configureStore } from '@reduxjs/toolkit';
import counterReducer from '../features/counter/counterSlice';

export const store = configureStore({
  reducer: {
    counter: counterReducer, // Add our counter reducer here
  },
});
Now, the state of our counter will be available at store.getState().counter.value.
Step 3: Create the Counter Component and Connect to Redux
Create a new file src/features/counter/Counter.js:
// src/features/counter/Counter.js
import React from 'react';
import { useSelector, useDispatch } from 'react-redux';
import { increment, decrement, incrementByAmount } from './counterSlice';
export function Counter() {
const count = useSelector((state) => state.counter.value);
const dispatch = useDispatch();
return (
{count}
);
}
Here’s what’s happening:
useSelector: This hook allows you to extract data from the Redux store state. We’re selecting thevaluefrom ourcounterslice.useDispatch: This hook gives you thedispatchfunction from the Redux store. You use it to dispatch actions.- When buttons are clicked, we dispatch the appropriate actions (
increment(),decrement(),incrementByAmount(5)). Redux then handles calling the reducers and updating the state, which in turn causes our component to re-render with the newcount.
Step 4: Render the Counter Component
Finally, update src/App.js to render your Counter component:
// src/App.js
import React from 'react';
import './/App.css'; // Assuming you have some basic CSS
import { Counter } from './features/counter/Counter';

function App() {
  return (


        Redux Counter Example


  );
}

export default App;
Run your application with npm start, and you should see a working counter! Congratulations, you’ve built your first Redux-powered React application!
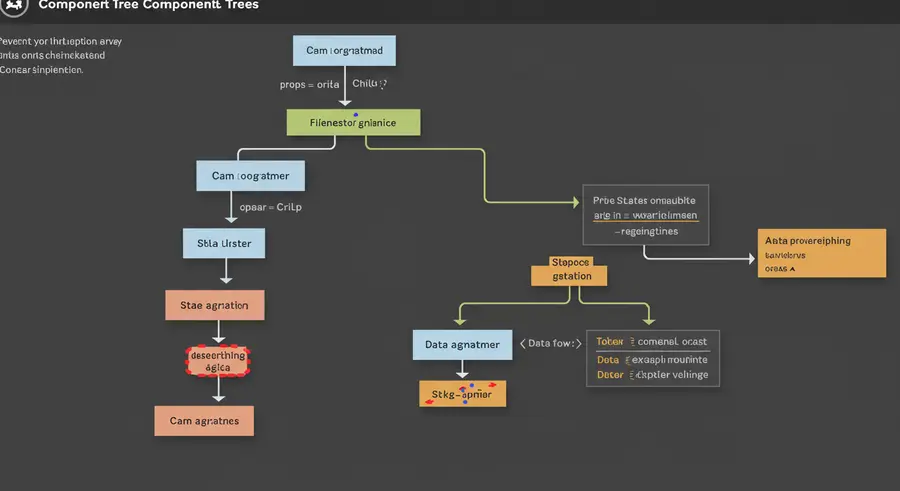
Figure 3: How React Components Connect to the Redux Store
Asynchronous Actions with Redux Thunk (Fetching Data)
Most real-world applications need to perform asynchronous operations, such as fetching data from an API. Reducers must be pure functions and cannot handle side effects directly. This is where Redux middleware comes in. Redux Thunk is a popular middleware that allows you to write action creators that return a function instead of an action object, enabling asynchronous logic.
Redux Toolkit already includes Redux Thunk by default, so we don’t need to install it separately. Let’s extend our counter example to simulate fetching an initial count from an API.
Step 1: Add Async Thunk to Counter Slice
Update src/features/counter/counterSlice.js:
// src/features/counter/counterSlice.js
import { createSlice, createAsyncThunk } from '@reduxjs/toolkit';

// First, create an async thunk
export const fetchInitialCount = createAsyncThunk(
  'counter/fetchInitialCount',
  async (amount, thunkAPI) => {
    // Simulate an API call
    const response = await new Promise(resolve => setTimeout(() => resolve({ data: amount + 10 }), 1000));
    return response.data;
  }
);

const initialState = {
  value: 0,
  status: 'idle', // 'idle' | 'loading' | 'succeeded' | 'failed'
  error: null,
};

export const counterSlice = createSlice({
  name: 'counter',
  initialState,
  reducers: {
    increment: (state) => {
      state.value += 1;
    },
    decrement: (state) => {
      state.value -= 1;
    },
    incrementByAmount: (state, action) => {
      state.value += action.payload;
    },
  },
  // The `extraReducers` field lets the slice handle actions defined elsewhere,
  // including actions generated by createAsyncThunk
  extraReducers: (builder) => {
    builder
      .addCase(fetchInitialCount.pending, (state) => {
        state.status = 'loading';
      })
      .addCase(fetchInitialCount.fulfilled, (state, action) => {
        state.status = 'succeeded';
        state.value = action.payload;
      })
      .addCase(fetchInitialCount.rejected, (state, action) => {
        state.status = 'failed';
        state.error = action.error.message;
      });
  },
});

export const { increment, decrement, incrementByAmount } = counterSlice.actions;

export default counterSlice.reducer;
Here’s the breakdown:
createAsyncThunk: This function takes an action type string (e.g.,'counter/fetchInitialCount') and a payload creator callback. The callback contains the asynchronous logic.extraReducers: This section allows your slice to respond to actions not defined directly in itsreducersfield (like the actions dispatched bycreateAsyncThunk, which generatespending,fulfilled, andrejectedactions).- We manage a
statusanderrorstate to provide feedback during the async operation.
Step 2: Dispatch the Async Thunk from Your Component
Update src/features/counter/Counter.js to dispatch fetchInitialCount when the component mounts and display the loading/error state:
// src/features/counter/Counter.js
import React, { useEffect } from 'react';
import { useSelector, useDispatch } from 'react-redux';
import { increment, decrement, incrementByAmount, fetchInitialCount } from './counterSlice';
export function Counter() {
const count = useSelector((state) => state.counter.value);
const status = useSelector((state) => state.counter.status);
const error = useSelector((state) => state.counter.error);
const dispatch = useDispatch();
useEffect(() => {
dispatch(fetchInitialCount(0)); // Dispatch when component mounts
}, [dispatch]);
if (status === 'loading') {
return <div>Loading...</div>;
}
if (status === 'failed') {
return <div>Error: {error}</div>;
}
return (
{count}
{ /* handle input if needed */ }}
/>
);
}
Now, when your Counter component loads, it will dispatch the fetchInitialCount thunk, simulate an API call, and update the count once the “data” is “fetched.” You’ll see a “Loading…” message briefly.
Advanced Redux Concepts
1. Middleware
Middleware provides a third-party extension point between dispatching an action and the moment it reaches the reducer. Middleware can be used for logging, crash reporting, interacting with an asynchronous API, routing, etc.
We’ve already used Redux Thunk, which is a middleware. Other popular middleware includes redux-logger for logging all actions and state changes, and redux-saga or redux-observable for more complex side effect management.
With Redux Toolkit, middleware is automatically set up for you by configureStore, including Redux Thunk and development-only middleware like redux-immutable-state-invariant and redux-devtools-extension.
2. Redux DevTools
A must-have for any Redux developer! The Redux DevTools Extension for browsers allows you to:
- Inspect every state change.
- See the actions that caused state changes.
- “Time-travel” debug by jumping to previous states.
- Hot reload reducers, even with time travel.
When using configureStore from Redux Toolkit, the Redux DevTools Extension is automatically enabled if installed in your browser, so no extra setup is usually required!
3. Reselect (Selectors)
As your application grows, your selectors can become more complex, especially when computing derived data from your state. reselect is a library for creating memoized (“cached”) selector functions. It ensures that a selector only re-computes its result when its input selectors’ results change, preventing unnecessary re-renders.
Example with reselect:
// src/features/todos/todoSelectors.js (example)
import { createSelector } from 'reselect';

const selectTodoState = (state) => state.todo;

export const selectTodos = createSelector(
  [selectTodoState],
  (todoState) => todoState.todos
);

export const selectCompletedTodosCount = createSelector(
  [selectTodos],
  (todos) => todos.filter(todo => todo.completed).length
);
Then, in your component:
// In your component
import { selectCompletedTodosCount } from './todoSelectors';
// ...
const completedCount = useSelector(selectCompletedTodosCount);
4. Structuring Redux Applications
How you organize your Redux code can significantly impact maintainability. Common patterns include:
- Ducks Pattern: This pattern suggests putting all the code related to a feature (actions, action creators, reducers, and even selectors) in a single file. This is largely what Redux Toolkit’s slices encourage.
- Feature-based folder structure: Group files by feature rather than by type (e.g.,
features/todos/actions.js,features/todos/reducers.jsvs.actions/todo.js,reducers/todo.js). Redux Toolkit’s approach aligns well with this.
Redux Best Practices and Tips
- Immutability is Key: Always return new state objects/arrays from your reducers. Never directly modify the original state. Redux Toolkit’s Immer integration handles this for you within `createSlice` reducers, but it’s a fundamental concept to understand.
- Normalize State: For complex data, especially when dealing with nested objects or relationships, consider normalizing your state. This means storing data in a flat object, with IDs as keys, and referencing relationships by ID. This makes updates easier and more performant. Libraries like
normalizrcan help. - Use Redux Toolkit: As repeatedly emphasized, Redux Toolkit simplifies Redux development significantly by providing helper functions that abstract away boilerplate and enforce best practices.
- Keep Reducers Pure: Ensure your reducers are pure functions. No side effects!
- Test Everything: Actions, action creators, reducers, and selectors are all pure functions or easily testable units. Write tests to ensure your state logic is robust.
- Leverage DevTools: Use the Redux DevTools extension to understand your application’s state flow and debug issues efficiently.
Conclusion: Your Redux Hero Journey Begins!
You’ve made it! From understanding the core principles of Redux to building a full-fledged application with asynchronous data fetching using Redux Toolkit, you now have a comprehensive understanding of how to manage state in large-scale React applications.
Redux, especially with Redux Toolkit, empowers you to build robust, maintainable, and scalable applications by providing a predictable state management pattern. While it introduces some initial overhead, the benefits in terms of debugging, consistency, and team collaboration often far outweigh the complexities as your application grows.
Keep practicing, build more complex applications, and explore other parts of the Redux ecosystem (like RTK Query for even simpler data fetching). The world of predictable state management awaits you!